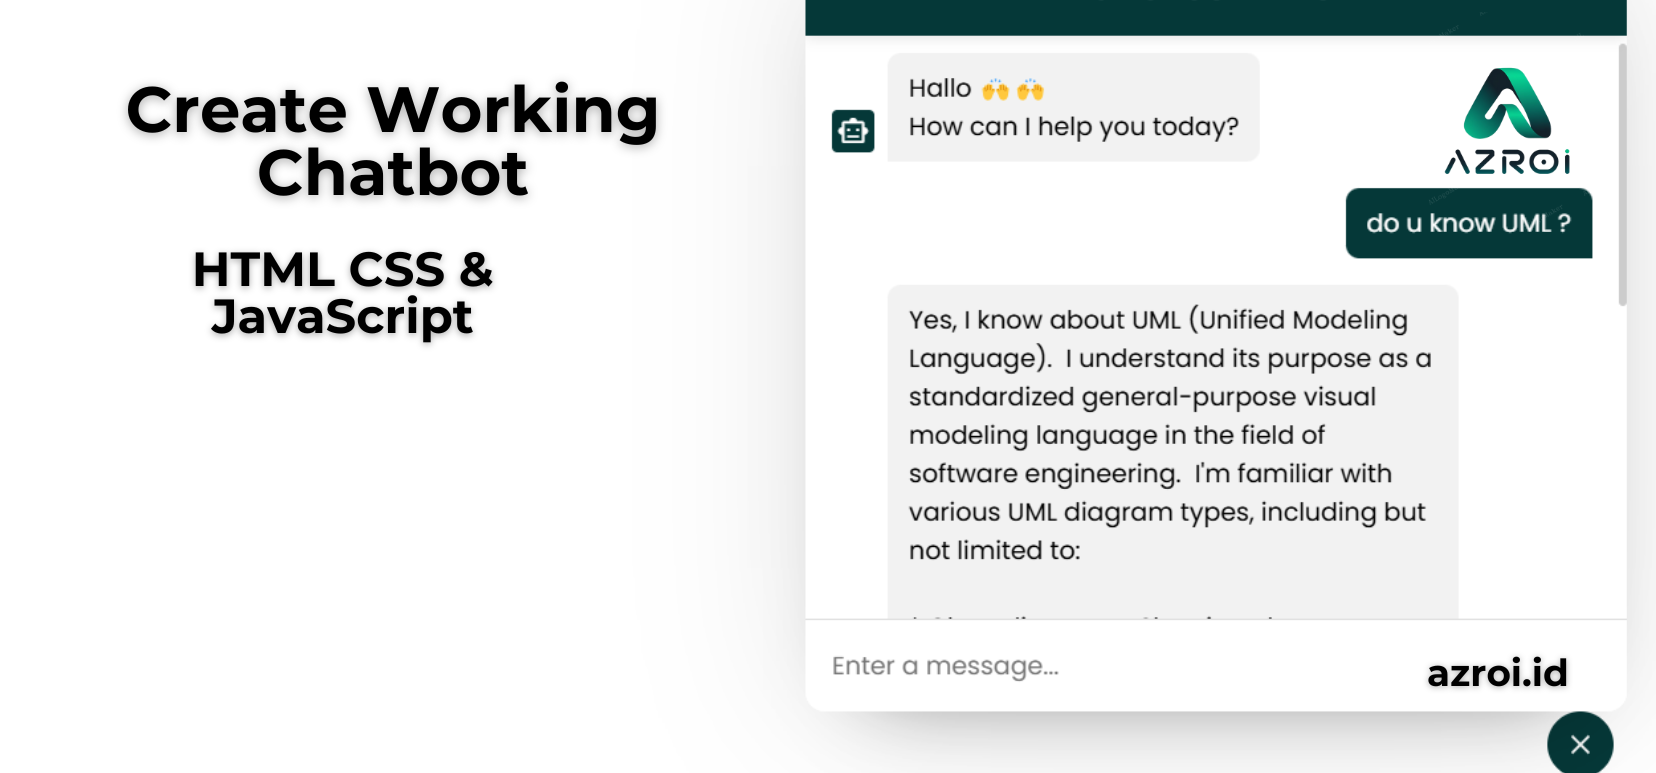
Membuat Chatbot Kustom dengan HTML, CSS, dan JavaScript: Panduan Lengkap
Chatbot telah menjadi komponen penting dalam pengalaman pengguna di berbagai platform, mulai dari website hingga aplikasi mobile. Dalam tutorial ini, kita akan membangun Chatbot Interaktif menggunakan HTML, CSS, dan JavaScript dengan integrasi API Google Gemini untuk menghasilkan respons cerdas.
Kenapa Membuat Chatbot Sendiri?
- Kontrol Penuh: Desain sesuai kebutuhan tanpa bergantung pada platform pihak ketiga.
- Belajar Pemrograman Web: Praktik langsung dengan HTML, CSS, dan JavaScript.
- Integrasi Fleksibel: Bisa dikembangkan dengan berbagai API seperti Gemini, OpenAI, atau backend custom.
- Biaya Efisien: Tidak perlu berlangganan layanan chatbot berbayar.
Struktur Project
chatbot-project/
├── index.html
├── style.css
└── script.js
Langkah 2: Styling dengan CSS (style.css)
/* Reset & Font */
@import url('https://fonts.googleapis.com/css2?family=Poppins:wght@400;500;600&display=swap');
* {
    margin: 0;
    padding: 0;
    box-sizing: border-box;
    font-family: 'Poppins', sans-serif;
}

body {
    background: linear-gradient(#f1fff4, #cbfff4);
}

/* Tombol Toggle */
.chatbot-toggler {
    position: fixed;
    bottom: 40px;
    right: 45px;
    width: 50px;
    height: 50px;
    border: none;
    border-radius: 50%;
    background: #053838;
    color: white;
    cursor: pointer;
    display: flex;
    align-items: center;
    justify-content: center;
    transition: all 0.3s ease;
}

/* Container Chatbot */
.chatbot {
    position: fixed;
    right: 30px;
    bottom: 100px;
    width: 620px;
    max-width: 90%;
    background: white;
    border-radius: 15px;
    box-shadow: 0 5px 20px rgba(0, 0, 0, 0.1);
    transform: scale(0.5);
    opacity: 0;
    pointer-events: none;
    transition: all 0.3s ease;
}

body.show-chatbot .chatbot {
    transform: scale(1);
    opacity: 1;
    pointer-events: auto;
}

/* Header Chatbot */
.chatbot header {
    background: #053838;
    padding: 16px 20px;
    color: white;
    text-align: center;
    border-radius: 15px 15px 0 0;
}

.chatbot header h2 {
    font-size: 1.2rem;
}

/* Area Chat */
.chatbox {
    height: 400px;
    overflow-y: auto;
    padding: 20px;
}

.chatbox .chat {
    display: flex;
    margin-bottom: 15px;
}

.chatbox .incoming {
    justify-content: flex-start;
}

.chatbox .outgoing {
    justify-content: flex-end;
}

.chatbox .chat p {
    max-width: 75%;
    padding: 12px 16px;
    border-radius: 10px;
    background: #f1f1f1;
    color: #333;
}

.chatbox .incoming p {
    border-radius: 10px 10px 10px 0;
}

.chatbox .outgoing p {
    background: #053838;
    color: white;
    border-radius: 10px 10px 0 10px;
}

/* Input Chat */
.chat-input {
    display: flex;
    gap: 10px;
    padding: 15px;
    border-top: 1px solid #ddd;
}

.chat-input textarea {
    flex: 1;
    border: none;
    outline: none;
    resize: none;
    max-height: 120px;
    padding: 10px;
    font-size: 0.95rem;
}

#send-btn {
    align-self: flex-end;
    color: #053838;
    cursor: pointer;
    font-size: 1.5rem;
}

/* Responsif */
@media (max-width: 490px) {
    .chatbot {
        right: 0;
        bottom: 0;
        width: 100%;
        height: 100%;
        border-radius: 0;
    }
}
Langkah 3: Logika JavaScript (script.js)
// 1. SELEKSI ELEMEN DOM
const chatbotToggler = document.querySelector(".chatbot-toggler");
const closeBtn = document.querySelector(".close-btn");
const chatbox = document.querySelector(".chatbox");
const chatInput = document.querySelector(".chat-input textarea");
const sendChatBtn = document.querySelector(".chat-input span");

// 2. VARIABEL KONFIGURASI
let userMessage = null; // Menyimpan pesan pengguna
const inputInitHeight = chatInput.scrollHeight; // Tinggi awal textarea
const API_KEY = ""; // API Key Gemini
const API_URL = `https://generativelanguage.googleapis.com/v1beta/models/gemini-1.5-flash:generateContent?key=${API_KEY}`;

// 3. FUNGSI PEMBUAT ELEMEN CHAT
const createChatLi = (message, className) => {
  const chatLi = document.createElement("li");
  chatLi.classList.add("chat", `${className}`);

  // Template untuk pesan masuk/keluar
  let chatContent = className === "outgoing"
    ? `<p></p>`
    : `<span class="material-symbols-outlined">smart_toy</span><p></p>`;

  chatLi.innerHTML = chatContent;
  chatLi.querySelector("p").textContent = message;
  return chatLi;
};

// 4. FUNGSI GENERATE RESPONSE DARI API
const generateResponse = async (chatElement) => {
  const messageElement = chatElement.querySelector("p");

  // Konfigurasi request API
  const requestOptions = {
    method: "POST",
    headers: { "Content-Type": "application/json" },
    body: JSON.stringify({
      contents: [{
        role: "user",
        parts: [{ text: userMessage }]
      }]
    })
  };

  try {
    // Eksekusi API call
    const response = await fetch(API_URL, requestOptions);
    const data = await response.json();

    // Error handling untuk response tidak OK
    if (!response.ok) {
      throw new Error(data.error.message);
    }

    // Format dan tampilkan response
    const formattedResponse = data.candidates[0].content.parts[0].text.replace(
      /\*\*(.*?)\*\*/g,
      '$1' // Hapus markdown bold (**)
    );
    messageElement.textContent = formattedResponse;
  } catch (error) {
    // Tampilkan error ke user
    messageElement.classList.add("error");
    messageElement.textContent = error.message;
  } finally {
    // Auto-scroll ke pesan terbaru
    chatbox.scrollTo(0, chatbox.scrollHeight);
  }
};

// 5. HANDLE CHAT USER
const handleChat = () => {
  userMessage = chatInput.value.trim();

  // Validasi input kosong
  if (!userMessage) return;

  // Reset input field
  chatInput.value = "";
  chatInput.style.height = `${inputInitHeight}px`;

  // Tampilkan pesan user
  chatbox.appendChild(createChatLi(userMessage, "outgoing"));
  chatbox.scrollTo(0, chatbox.scrollHeight);

  // Delay untuk simulasi "typing"
  setTimeout(() => {
    // Tampilkan status "Thinking..."
    const incomingChatLi = createChatLi("Thinking...", "incoming");
    chatbox.appendChild(incomingChatLi);
    chatbox.scrollTo(0, chatbox.scrollHeight);

    // Generate response dari API
    generateResponse(incomingChatLi);
  }, 600);
};

// 6. EVENT LISTENERS
// Auto-resize textarea
chatInput.addEventListener("input", () => {
  chatInput.style.height = `${inputInitHeight}px`;
  chatInput.style.height = `${chatInput.scrollHeight}px`;
});

// Handle Enter key
chatInput.addEventListener("keydown", (e) => {
  if (e.key === "Enter" && !e.shiftKey && window.innerWidth > 800) {
    e.preventDefault();
    handleChat();
  }
});

// Handle click events
sendChatBtn.addEventListener("click", handleChat);
closeBtn.addEventListener("click", () =>
  document.body.classList.remove("show-chatbot")
);
chatbotToggler.addEventListener("click", () =>
  document.body.classList.toggle("show-chatbot")
);
Cara Mendapatkan API Key
- Kunjungi Google AI Studio
- Buat project baru
- Klik “Create API Key”
- Salin kunci ke variabel
API_KEY
Masalah Umum:
- API error: Pastikan API key valid
- Tampilan rusak: Cek path file CSS/JS
- Ikon tidak muncul: Verifikasi koneksi internet
Optimasi Performa:
// Debounce untuk input
let timeout;
chatInput.addEventListener('input', () => {
    clearTimeout(timeout);
    timeout = setTimeout(handleChat, 1000);
});
Kesimpulan
Dalam tutorial ini kita telah membuat:
✅ Antarmuka chatbot responsif
✅ Sistem kirim pesan real-time
✅ Integrasi AI dengan Gemini API
✅ Error handling dasar
Ide Pengembangan Lanjutan:
- Tambahkan autentikasi pengguna
- Simpan riwayat chat di localStorage
- Implementasi voice recognition